
The best way to organize video files is to store them on large secondary drives, sort your folders by where the videos came from, and use a video catalog to find them. A folder can only sort your videos one way. You often want to find them by date, by who is in them, by who shot them or by project. A catalog gives you all of those without moving a file.
This guide is for anyone that has to manage and work with more than a few video files. This can be anything from your personal family videos to professional shoot footage. Having a good structure will allow you to work faster, spend less time looking for the footage you need, and have less risk of data loss.
Start with what you already have
You do not need to reorganize the files you already have. If you have years of video on several drives, that means moving and renaming thousands of files. I would not do that. It is a lot of work, and an editing project points at its files by path, so a moved file shows up as offline. Leave your old files where they are and use the structure below for new footage.
Storage
Let’s start with storage. Video files are large, and you need somewhere to store them. Video files are typically read from the beginning of the file to the end in sequence. Because of this, they do not benefit much from SSDs, which are much faster for random access reads compared to a normal HDD but also more expensive.
For video storage, use an external high-capacity USB drive. You can also easily add new external drives as you need more storage space. If you need more capacity than you get from an external USB drive, you can look at NAS (Network attached storage) solutions. A NAS solution might also be good if you need several users accessing the videos at once.
I keep my catalog on an SSD and most of my videos on several external USB drives and a NAS.
Windows can give a USB drive a different letter from one day to the next. To avoid broken paths, add a special folder on the Special Folders tab in Preferences, for example [EXTERNAL] for an external drive. If the drive letter changes, you update the mapping and everything works as before.
Folder structure
Pick a clean folder structure for your videos. The key purpose of the folder structure should be to eliminate the time you need to think about where to put your videos.
A big problem with folders is that you want several ways to sort your content. Perhaps by date, perhaps by who is in it, who shot it or which project it was for. A folder can only give you one of those. So do not try to make the folders do that job. How to find videos is handled by your video catalog, discussed later.
Sort by source instead. If your files are videos from different sources, organize them by source and category. Then you can always trace a video back to where it came from. If you get more videos from that source, you know where to put them immediately. It also makes it easy to see if you already have a video, so you avoid duplicates. If you record videos yourself, each shoot is a source. Use the year or the shooting location, and you instantly know what to name your new folder.
Video
  Shoots
    2026 Iceland trip
    2026 Client Y interviews
  Drone
  Phone
  Client deliveries
  Stock footage
  Music
This also helps when a drive gets full. A source folder can move to its own drive, and you still know where everything goes.
You do not need a file naming system either. Many guides tell you to put the date first in every file name. If you also want the project and the people in the name, you end up with a full naming schema that you have to follow for every file. A catalog does that job with keywords, and you can change those without renaming a file.
Video metadata
Some video files have metadata in the video files. Unfortunately, video metadata has no consistent standard across all video formats.
In Windows, you can view video metadata by right-clicking a video file, selecting properties, and then going to the details page. Some metadata can be edited, like the rating, tags, and comments. Some are read-only and derived from the video file.

You can search for this metadata in File Explorer. Write tags: at the start to only search for tags. If you have a small collection, fewer than about 100 videos, this might be all you need.

But, if you have files across multiple devices, this way of searching per folder is not ideal, and it is also pretty slow once your video library starts to grow. File Explorer cannot search a drive that is not connected. Another problem is that you don’t get an overview of the content of a video if it’s more than a few minutes, since the whole video is represented by one thumbnail.
Video asset management
Video asset management lets you organize all your videos in one single place. Most software is similar to the Windows Explorer approach and treats the file as a whole. Videos, however, are a special case since they change over time. You typically want to get an overview of the entire content of the video.
Fast Video Cataloger is a video asset management software for Windows. It indexes all your videos into one searchable database called a catalog. Store the catalog file on your local drive, on a fast device like an SSD. You can search across multiple devices, and it works for drives that have been indexed but are not connected to your computer. The program also extracts thumbnails from the whole video, so you get a timeline of the entire video to help you know if it is the right one.
We built it around one idea. People are very good at recognizing pictures, so use your eyes. A search gets you close, and then you look:
- Search. Use a keyword or a part of the path to narrow your whole catalog down to a manageable set of videos. Press Ctrl+I and type a word.
- Browse. Look at the video images. In icon mode you only see the images, so more videos fit on the screen.
- Find. Click a video. You get its thumbnails along the timeline, so you can see what is in the video without playing it. Double-click a thumbnail to play from that point.
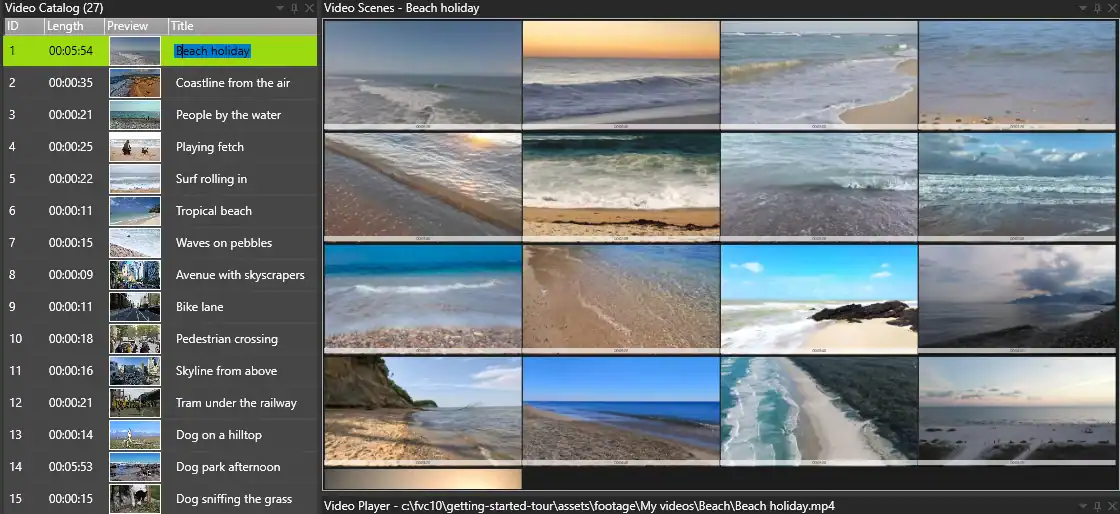
This is what the folders could not do. The same video can be found by date, person, project or subject, wherever it is stored.
Add keywords
As you add videos to Fast Video Cataloger, you should also add keywords. Ensure the indexing settings are set to use the metadata in the video. Check the preference on the index tab.
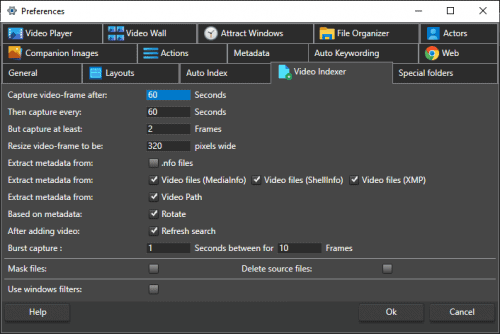
Your folder names can become keywords too. In Preferences, go to the Auto Tag tab and tick Add Keywords from video path. Sorting by source then gives every video a keyword for where it came from.
You can add keywords as part of the indexing step or later as you work with videos. Keywords can be assigned to multiple videos simultaneously, and you can assign keywords to specific times inside a video.
Don’t overdo the keywording when you start. Make it a part of using the catalog and add them as you work. Too many keywords can make finding what you are looking for harder, but keywords like projects where a video was used can be invaluable a few years from now.
For an old collection, AI image tagging can do a first pass. If your videos have speech, you can also search them by the words spoken. The AI features are optional. Switch on the ones you want in Preferences. They run on your own PC, and no video is uploaded.
What if you move files later?
If you moved footage to a new drive in File Explorer, the catalog still points at the old place, but nothing is lost. Open Maintenance > Repair, click Start, tick the videos it reports and give it the new folder. See how to use the repair tool in the docs.
DaVinci Resolve
If you are doing video editing in software like DaVinci Resolve, it has video management and advanced search built into the software.

If you are working on a video project, you can easily drag in the videos you need from Fast Video Cataloger into DaVinci Resolve and then manage the video for the project there. Use Fast Video Cataloger for your entire asset catalog, including previous work, and Resolve for the current project. Keeping the videos you need in the project makes your work in Resolve cleaner and less cluttered.
Backup
All drives will eventually fail at some time. How long a drive lives depends on the type of drive, how much use it gets, and a random factor. Always make sure you have a backup solution for your video footage. Extra drives for space are not a backup.
An easy solution is to use Backblaze. Their software automatically backs up all connected drives as you work. In case of a disaster, you can download your files or pay them to send you a new drive with your backup data. Also, make sure to back up your video catalog file.
Always keep your original files. Video formats are lossy, so every time you recompress a video it loses some quality. The same goes if you improve old videos with AI upscaling. Development is progressing, and a few years from now you might get an even better result if you start from the original.

Watch it
Conclusion
A clear plan for how to organize video files can make you more productive and save time and money. Here is a quick recap:
- Store your videos on large external drives or a NAS.
- Sort your folders by source, so you always know where a new video goes.
- Use a video catalog to find videos by date, person, project or scene.
- Have automatic backups in place.
Fast Video Cataloger runs on Windows 10 and 11 and works with the folders you already have. Download the free 30-day trial and add one folder to see your footage as thumbnails.